Tuesday 26 February 2013
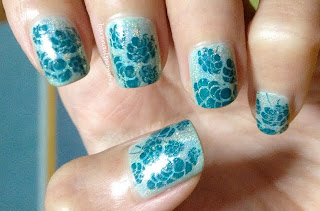
Essence Bashful and marbling with China Glaze Cherish and Passion
Colours used:
Base - Essence Bashful (from Snow White collection)
Marbling colours - China Glaze Cherish and Passion
Bashful was the only one that caught my eye from the Snow White collection and I'm happy with my pick, as it is a beautiful jade green with gold shimmers. Cherish and Passion are from the old China Glaze Romantique collection but I got them as I read that they were good for stamping :)
This is my 2nd try at marbling, the first time I forgot to put a base and tried to do all 10 fingers and it ended up being one of my longest and least enjoyable nail polishing times (>.<)
It was many months before I gathered courage to try again :p And to make sure I wasn't stuck doing it for hours, decided to do it only on the ring and thumb. It turned out not too disastrous but I still can't seem to get the nice petal like pattern, argh....
Do share if you have any tips for nicer marbling.....I need the help, haha...
Posted by
barenailsnomore
at
20:50

Essence Bashful and marbling with China Glaze Cherish and Passion
2013-02-26T20:50:00+08:00
barenailsnomore
china glaze|essence|green|marbling|nails|
Comments
Labels:
china glaze,
essence,
green,
marbling,
nails
OPI The World Is Not Enough stamped with BM202
Colours used:
Base - OPI The World Is Not Enough
Stamping polish - Konad black
Plate BM202
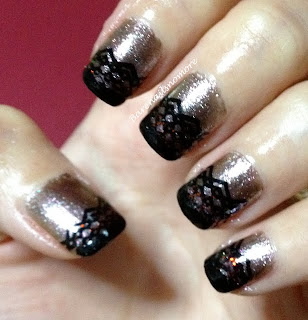
The World is Not Enough is very shimmery and reminds me of Jessica's Smoky Feather, except that the former has tiny pink glitter while latter has green ones. I didn't want to leave it plain so did some stamping but it turned out kinda weird, so I freehand the tips as well.
And here is an awkward shot with the mini bottle, haha
Thanks for looking!
Posted by
barenailsnomore
at
20:46

OPI The World Is Not Enough stamped with BM202
2013-02-26T20:46:00+08:00
barenailsnomore
bundle monster|nails|opi|stamping|
Comments
Labels:
bundle monster,
nails,
opi,
stamping
Monday 25 February 2013
Essence Enchanted Fairy and You Belong to Me gradient stamped with BM308
Colours used:
Pink - Essence Enchanted Fairy
Blue - Essence You belong to me
Glitter - Essence Space Queen
Stamping polish - Konad white
Plate - BM308
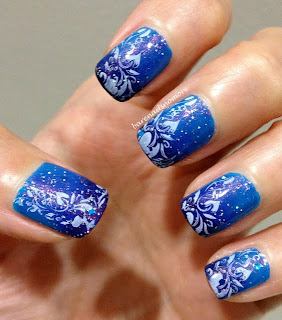
Enchanted Fairy is a cool pink creme while You belong to me is a light aqua, though it looks a little darker here. Can't really see Space Queen in this pic but it is a fine multi colored glitter. The color combi ended up reminding me a little of Little Twin Stars, haha...
Thanks for looking!
Posted by
barenailsnomore
at
22:48

Essence Enchanted Fairy and You Belong to Me gradient stamped with BM308
2013-02-25T22:48:00+08:00
barenailsnomore
blue|bundle monster|essence|gradient|nails|pink|stamping|
Comments
OPI The Spy who Loved Me with BM316 and fishtail braid
Colours used:
Base - OPI The Spy who Loved Me
Stamping polish - Essie Penny Talk
Plate - BM316
Fishtail braid - OPI The Spy who Loved Me, OPI Goldeneye and Revlon Mad about Mango lined with Essie Penny Talk
I got the OPI Skyfall collection minis and was excited to try them out. The Spy who Loved Me was a pretty red with gold shimmers and this was 2 coats. The only negative was that it stained badly on me! Did not come across other people mentioning this, but somehow it was one of the most staining polishes I have come across, and I did put a base coat :(
For the fishtail braid, Goldeneye was a beautiful gold glass flake polish but quite sheer and I had to apply 2-3 layers for it to show up, so thank goodness I was only doing the ring finger or I might have taken ages....haha... It was fun though and I think I might sit down to do a full set of fishtail braids one of these days (with opaque polishes this time :p)
Thanks for looking!
Posted by
barenailsnomore
at
22:35

OPI The Spy who Loved Me with BM316 and fishtail braid
2013-02-25T22:35:00+08:00
barenailsnomore
bundle monster|essie|freehand|nails|opi|red|revlon|stamping|
Comments
Sunday 24 February 2013
Polka dots and Mambo dog
Colours used:
Base and dots: Various Miki polishes
Glitter on ring finger: OPI Rainbow connection and Essence Prince Charming
Thumb: Acrylic paint and Essence Prince Charming
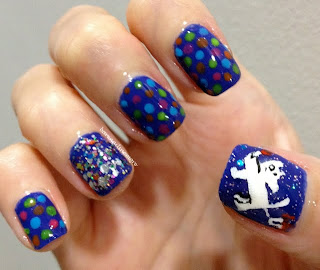
It was for an occasion with a Mambo theme, hence the icon from the Mambo brand :p This is actually my first time doing polka dots and I found it quite hard to keep the dots the same size and equally spaced (-_-)" Definitely need more practice...but at least the colour combi turned out quite well :)
The dog was NOT painted using my left hand of course (there's no way I could have such dexterity, haha), instead I painted it on a layer of clear polish on a plastic bag, covered it with another layer of clear polish and peeled it off to stick onto my thumb after it dried. It was a little thick but this was the only way I could have anything more complicated than misshaped flowers on my right hand :p
Thanks for looking!
Posted by
barenailsnomore
at
23:27

Polka dots and Mambo dog
2013-02-24T23:27:00+08:00
barenailsnomore
acrylic paint|blue|dotting|essence|freehand|glitter|nails|opi|
Comments
Revlon Scandalous stamped with BM316
Colours used:
Base - Sally Hansen Pat on the Black
Glitter polish - Revlon Scandalous
Stamping polish - Sally Hansen Pink Satin
Plate - BM316
Pat on the Black is an extremely dark plummy creme, and is under the Complete Salon Manicure line, which meant that I had to deal with the wide brush which I found quite hard to control (>_<)
Anyway, I used it as I wanted to make sure I didn't need to layer too much and actually I think Scandalous might not have required it, I probably could have gotten away with 3 coats of it alone.
Scandalous is gorgeous, fine + medium hex magenta glitter in sheer black jelly base and I was sorely tempted to leave it as it is, but in the end, itchy stamping fingers won out and decided to add a little stamping at the tips. Thankfully it didn't end up overly complicated and also still left plenty of Scandalous for me to keep staring at :p
PS: I now freely put on glitter polishes after I learnt of the PVA glue method and I will attest that it does work :D See below:
You can read more about it in prettypurplepolish's post.
Thanks for looking!
Posted by
barenailsnomore
at
19:05

Revlon Scandalous stamped with BM316
2013-02-24T19:05:00+08:00
barenailsnomore
bundle monster|glitter|nails|purple|revlon|sally hansen|stamping|
Comments
Labels:
bundle monster,
glitter,
nails,
purple,
revlon,
sally hansen,
stamping
Saturday 23 February 2013
Gradient with Max Factor Fantasy Fire and stamped with BM309
I was lucky and found Fantasy Fire during my Australia trip. There were only 2 left on the rack and I was tempted to get both as the bottle was tiny and this was afterall the highly raved Fantasy Fire! :p But I resisted and decided to let another lucky soul find it :)
Colours used:
Blues in base - Miki polishes
On top of blues - Max Factor Fantasy Fire (1 coat)
Stamping polish - Konad
Plate - BM309
Glitter - Essence Prince Charming
Sorry, but the pictures are totally not giving credit to Fantasy Fire and Prince Charming! :(
Fantasy Fire is really beautiful over the blue and I actually wore it plain for 2 days before getting itchy fingers and adding the stamping. Prince Charming was great with its tiny holographic glitter and larger blue hexes, very sparkly and overall, I was quite happy how this turned out :)
Thanks for looking!
Posted by
barenailsnomore
at
23:46

Gradient with Max Factor Fantasy Fire and stamped with BM309
2013-02-23T23:46:00+08:00
barenailsnomore
blue|bundle monster|essence|glitter|gradient|max factor|nails|stamping|
Comments
Labels:
blue,
bundle monster,
essence,
glitter,
gradient,
max factor,
nails,
stamping
Hot pink nails with houndstooth print BM322
Colours used:
Base - Miki neon pink
Stamping polish - Sally Hansen Pink Satin
Plate - BM322
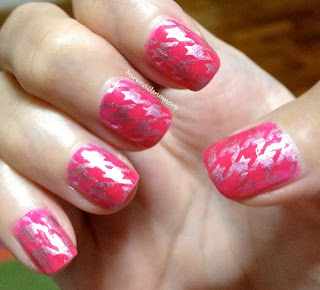
Miki was a brand of polish I picked up in Australia, as I wanted a set of neon colours and they were cheap. It dries to a matte kind of finish and the brush was quite hard to work with, especially since the cap was squarish.
I like the houndstooth design very much, but realised I needed to align it really straight, otherwise it will have no resemblance to houndstooth once it's slanted (I kept thinking of camouflage somehow), which was what happened to my left hand that is not shown :p
Thanks for looking!
Posted by
barenailsnomore
at
23:44

Hot pink nails with houndstooth print BM322
2013-02-23T23:44:00+08:00
barenailsnomore
bundle monster|nails|pink|sally hansen|stamping|
Comments
Labels:
bundle monster,
nails,
pink,
sally hansen,
stamping
Friday 22 February 2013
Revlon Mischievous stamped with Sally Hansen Silver Sweep + BM321 and mattified
Colours used:
Base - Revlon Mischievous
Stamping polish - Sally Hansen Silver Sweep
Plate - BM321
Matte top coat - Rimmel Mattifying Topcoat
Silver Sweep was another polish I read so much about but not sold here like Revlon Whimsical, so again, luckily, when I was overseas, I saw it and grabbed it :D
Mischievous is a medium taupe, leaning towards purple and 2 coats was enough for me. Silver Sweep as testified by many bloggers, is good stamping polish and I'm glad to finally have a silver stampable polish. Rimmel does the mattifying quite well and I'm happy with this cheaper alternative to Essie Matt About You.
The stamping this time is a little patchy but still passable and I must admit I love general full nail designs, as I hardly need to align them at all, hehe....

Posted by
barenailsnomore
at
23:22

Revlon Mischievous stamped with Sally Hansen Silver Sweep + BM321 and mattified
2013-02-22T23:22:00+08:00
barenailsnomore
bundle monster|matte|nails|revlon|rimmel|sally hansen|silver|stamping|taupe|
Comments
Labels:
bundle monster,
matte,
nails,
revlon,
rimmel,
sally hansen,
silver,
stamping,
taupe
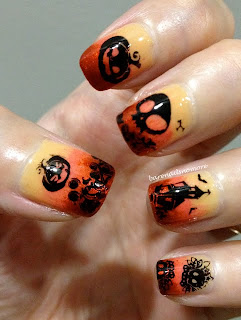
Gradient Halloween nails
The timing of this is rather off I must admit :p but as I mentioned in my 2nd post, I am clearing my old pics first before catching up to "real time" ones, so pls bear with me....
Colours used:
Base - Essence Peaches (from Marble Mania)
Middle - Revlon Mad about Mango
Tip - Orly Flicker
Stamping polish - Konad
Plate - BM224, BM222, BM305, BM310
Flicker was quite sheer and I had to resort to dabbing it on with the brush instead of using the sponge. Anyway, I had just received the Konad black polish that day and was extremely pleased to see the darkness of it :D However, it dried faster than I expected, so I had to work faster as compared to when I used my metallic polishes for stamping. Also, as people have mentioned, you need to give it time to dry and use a light hand for top coat or it would smudge (which I couldn't avoid due to my impatience and heavy hand, sigh).
But overall, I'm glad to have gotten the Konad stamping polish as its density makes the images come out more crisp!
Posted by
barenailsnomore
at
23:04

Gradient Halloween nails
2013-02-22T23:04:00+08:00
barenailsnomore
bundle monster|essence|konad|nails|orange|orly|revlon|stamping|
Comments
Revlon Whimsical (Deborah Lippmann Glitter in the Air dupe)
Loved the polish when I saw it in the blogs and was so envious of the US girls as it was not available here. Then on my Hong Kong holiday, found it along with Scandalous and Sparkling and I immediately grabbed all 3 with an internal squeal :p
I wore one coat of sheer polish under this which I cannot remember and 2 coats of Whimsical. Think I will sit down one day to patiently put it on on its own, it's such a pretty polish after all :)
Posted by
barenailsnomore
at
22:49

Revlon Whimsical (Deborah Lippmann Glitter in the Air dupe)
2013-02-22T22:49:00+08:00
barenailsnomore
blue|glitter|nails|revlon|
Comments
Thursday 21 February 2013
Orly Flicker stamped with Essie Penny Talk + BM214
Colours used:
Base - Orly Flicker
Stamping polish - Essie Penny Talk
Plate - BM214
Flicker has a the glow from within look which is not shown here unfortunately, but it is a pretty burnt orange which reminds me of autumn, hence I decided to add the leaves stamp. Penny Talk works well as a stamping polish, so I guess it's true that most, if not all, metallics do well, which is a good thing as I can save on Konad polishes :p
Posted by
barenailsnomore
at
22:16

Orly Flicker stamped with Essie Penny Talk + BM214
2013-02-21T22:16:00+08:00
barenailsnomore
bundle monster|essie|gold|nails|orange|orly|stamping|
Comments
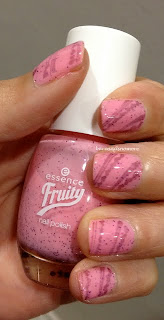
Essence Mashed Berries stamped with BM317
Colours used:
Base - Essence Mashed Berries
Stamping polish - I believe it was Golden Rose Magnetic Nail Lacquer 08
Plate - BM317
When I saw Essence's Fruity collection, I was instantly drawn to the polishes as they looked so much like fruit drink with seeds in it :p I got Mashed Berries and One Kiwi a Day (which is still an untried *guilty look*) and the former was pretty sheer. Above was 2 coats, stamping, and another coat.
Guess I was too obsessed about using my stamping plates as I think it would have looked better just by itself, since my stamps were a mess and with stamps, it didn't look like a fruit drink with seeds anymore :(
Somehow I don't find stamping easier with practice, sometimes I get a decent mani, sometimes (maybe I should say "most times") it's a disaster which I can't wait to take off. And looking at my favourite blogs' picture perfect stamping only makes me wonder when I will ever reach somewhere near their level....maybe 500 manis later? Or maybe just not in my lifetime....haha....
Posted by
barenailsnomore
at
21:57

Essence Mashed Berries stamped with BM317
2013-02-21T21:57:00+08:00
barenailsnomore
bundle monster|essence|glitter|golden rose|nails|pink|stamping|
Comments
Labels:
bundle monster,
essence,
glitter,
golden rose,
nails,
pink,
stamping
Essence Sure Azure stamped with BM312 and BM311
Colours used:
Base - Essence Sure Azure
Wavy lines - Essence Let's Get Lost and BM312
Flowers - Sally Hansen Pink Satin and BM311
I thought Let's Get Lost would work as a stamping polish as it was opaque in my previous post but it didn't stamp as well as I hoped, probably cos of my poor stamping skills and thin lines involved as well (-_-)"
So I decided to add flowers to it to help distract and cover up the mess, and thankfully, Pink Satin stamps very well and helped to make it look halfway decent so that I didn't need to remove and redo my nails *phew* :p And I guess I ended up with a bit of a wallpaper-ish look?
Posted by
barenailsnomore
at
21:56

Essence Sure Azure stamped with BM312 and BM311
2013-02-21T21:56:00+08:00
barenailsnomore
blue|bundle monster|essence|flowers|nails|pink|sally hansen|stamping|
Comments
Labels:
blue,
bundle monster,
essence,
flowers,
nails,
pink,
sally hansen,
stamping
Essence Lime Up! stamped with BM321
Colours used:
Base - Essence Lime Up!
Stamping polish - Golden Rose (white, no name)
Plate - BM321
Lime Up was more of a Shrek colour, whilte the pic shows it a little brighter. I barely managed to get the design out using normal polish so I decided to get a proper white stamping polish in addition to a black (after failing in using Essence Galactic Black in this post).
But I like this stamping design and should probably try this again with other colour combinations...
Posted by
barenailsnomore
at
20:01

Essence Lime Up! stamped with BM321
2013-02-21T20:01:00+08:00
barenailsnomore
bundle monster|essence|golden rose|green|nails|stamping|
Comments
Labels:
bundle monster,
essence,
golden rose,
green,
nails,
stamping
Wednesday 20 February 2013
Red roses stamped on white BM323
Colours used:
Base: Golden Rose (white, no name)
Stamping polish: Essence Applause, Applause (from Circus Circus collection)
Stamp: BM323
When I got my Bundle Monster 2012 plates, the roses image caught my eye instantly and I googled to see what have others done with it. I saw a red on white that looked gorgeous, hence I decided to follow the colour scheme, and I'm glad I did! Think this is my favourite stamping design so far and I'm even more pleased that although Applause, Applause look straight up red, it has a pinkish tinge to it when stamped.
Do you like this stamp as well? :)
Posted by
barenailsnomore
at
22:40

Red roses stamped on white BM323
2013-02-20T22:40:00+08:00
barenailsnomore
bundle monster|essence|flowers|golden rose|nails|red|stamping|white|
Comments
Labels:
bundle monster,
essence,
flowers,
golden rose,
nails,
red,
stamping,
white
Sally Hansen Golden-I stamped with BM210
Colours used:
Base - Sally Hansen Golden-I
Stamping polish - Essence Galactic Black
Stamp - BM210
Don't think this picture shows it sufficiently but Golden-I was more shimmery. 2 medium coats shown above. You can have another look at Golden-I in this post where it was sponged on. Galactic Black was actually fainter in real life so I decided to invest in a black Konad polish after that :p
Update: I have better plain swatch pics of Sally Hansen Golden-I here.
Have gotten 2 sets of plates from Bundle Monster so you will be seeing quite a number of stamped manis in the future!

Posted by
barenailsnomore
at
21:30

Sally Hansen Golden-I stamped with BM210
2013-02-20T21:30:00+08:00
barenailsnomore
bundle monster|essence|gold|nails|sally hansen|stamping|
Comments
Labels:
bundle monster,
essence,
gold,
nails,
sally hansen,
stamping
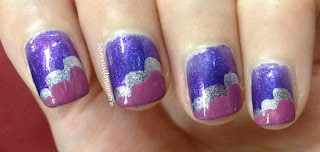
Purple silver pink cloud mani
Here's another cloud mani, with more differentiated colours this time....
Colours used:
Base - Three Beauties Radiant Lavender
Middle - Sally Hansen Celeb City
Tips - Essence Meet Me Now!
Radient Lavender is rather sheer and could have benefited from another coat (I put 2 for this) but it is quite pretty - shimmery purple, with flashes of magenta. Celeb City is a standard shimmery silver and although others have managed to stamp with it, I never had any success :( Meet me now is a purplish pink creme and applies quite well.
That's about it...thanks for looking!
Posted by
barenailsnomore
at
20:28

Purple silver pink cloud mani
2013-02-20T20:28:00+08:00
barenailsnomore
cloud|essence|freehand|nails|pink|purple|sally hansen|silver|three beauties|
Comments
Labels:
cloud,
essence,
freehand,
nails,
pink,
purple,
sally hansen,
silver,
three beauties
Pink striped with daisies
Wanted to practice stripes and flowers so here was the result....
Colours used:
Base - Couleur Inc Botein
Stripes - Sally Hansen Golden-I
White - Golden Rose (can't find name)
Blue dot - China Glaze For Audrey
This reminds me somewhat of Kate Spade, what do you think? :)
Posted by
barenailsnomore
at
00:49

Pink striped with daisies
2013-02-20T00:49:00+08:00
barenailsnomore
china glaze|couleur inc|flowers|freehand|golden rose|nails|pink|sally hansen|
Comments
Labels:
china glaze,
couleur inc,
flowers,
freehand,
golden rose,
nails,
pink,
sally hansen
Tuesday 19 February 2013
Metallic pink gold gradient - Sally Hansen Pink Satin and Golden-I
Colours used:
Pink - Sally Hansen Pink Satin
Gold - Sally Hansen Golden-I
Glitter - Essence Make it Golden
Pink Satin is an opaque cool pink metallic and only required 1 coat. It works well as a stamping polish, which will be shown in later posts :) Golden-I is a shimmery light gold which is quite sheer, had to sponge a couple of times to get it to show up more clearly. Make it Golden is pretty dense with fine gold glitter and hexes and this is 1 coat with no fishing of hexes required.
Guess I really should buff my nails before applying metallic polishes (>_<) but I always wondered, what is the limit to buffing? Kinda afraid it will make my nails too thin or brittle.....

Posted by
barenailsnomore
at
23:30

Metallic pink gold gradient - Sally Hansen Pink Satin and Golden-I
2013-02-19T23:30:00+08:00
barenailsnomore
essence|gold|gradient|nails|pink|sally hansen|
Comments
Essence Cafe Ole with silver gradient tips and square studs
I got another pack of studs from Born Pretty Store, this time square, silver and larger, though I probably should have bought gold ones since they will become silver after you remove them (which I would reuse :p). But I guess at least the silver goes quite well with the nude.
Colours used:
Base - Essence Cafe Ole
Gradient - Sally Hansen Celeb City
Cafe Ole applied well and only 2 coats were needed. The square studs were more prone to falling off than the gold round ones I had used previously as they were larger and more raised, but they still lasted a couple of days. Think studs are an easy way to dress up your nails and a good addition to your nail art arsenal, provided you don't have the tendency to pick them off your nails :p

Posted by
barenailsnomore
at
23:19

Essence Cafe Ole with silver gradient tips and square studs
2013-02-19T23:19:00+08:00
barenailsnomore
beige|essence|gradient|nails|nude|sally hansen|silver|studs|
Comments
Monday 18 February 2013
Glitter Gal Silver 3D Holo as top layer with stamping
I saw that Glitter Gal has some great linear holos and decided to get one which could be layered over other colours. Also got a set of Bundle Monster plates since I managed to stamp relatively okay previously. If you would like to see just the holo over the base, pls click read more :)
Posted by
barenailsnomore
at
23:49

Glitter Gal Silver 3D Holo as top layer with stamping
2013-02-18T23:49:00+08:00
barenailsnomore
blue|bundle monster|essie|glitter gal|holographic|nails|orly|stamping|
Comments
Labels:
blue,
bundle monster,
essie,
glitter gal,
holographic,
nails,
orly,
stamping
Essence Let's get lost and studs
I got into the stud trend due to the great stud manis by Nailasaurus.
Colors used:
Base - Essence Let's get lost
Studs from Born Pretty Store [free international shipping ;)]
Let's get lost was easy to apply and a perfect blue for a beach vacation that I wore it to :) I only applied one coat above but two would have been better as you can very faintly see the nail lines under strong light and it chipped quite easily. For the studs, I painted where I wanted the studs with clear polish, then dipped a toothpick in clear polish before picking up the stud and placing it. You will see that one of the studs was sunk in the blue polish and I believe I was trying to adjust the position too much and the polish wasn't dry enough.
Also, I found that I can pick out the studs from the cotton wool after removal and they would be silver as the polish remover would have removed the gold coating, so effectively I could reuse them and they are in another color as well! ;) But the pack from bornprettystore has quite a lot of studs in it, don't think I can finish them actually, haha....
Posted by
barenailsnomore
at
21:43

Essence Let's get lost and studs
2013-02-18T21:43:00+08:00
barenailsnomore
blue|essence|nails|studs|
Comments
Color Club Wild at Heart stamped with Jessica Iridescent Eye
Posted by
barenailsnomore
at
19:51

Color Club Wild at Heart stamped with Jessica Iridescent Eye
2013-02-18T19:51:00+08:00
barenailsnomore
color club|jessica|kleancolor|nails|purple|stamping|
Comments
Labels:
color club,
jessica,
kleancolor,
nails,
purple,
stamping
Pink blue gradient nails with topped with OPI Pirouette My Whistle
Posted by
barenailsnomore
at
19:12

Pink blue gradient nails with topped with OPI Pirouette My Whistle
2013-02-18T19:12:00+08:00
barenailsnomore
blue|china glaze|glitter|gradient|nails|opi|orly|pink|
Comments
Sunday 17 February 2013
Essence Wanna Be Your Sunshine with flowers
Colours used:
Base: Essence Wanna Be Your Sunshine
Flowers: Acrylic paints
Here was another attempt at freehand flowers with acrylic paint whereby I managed to get in smaller strokes but think the yellow clashes with my skin tone? Plus I guess I should have painted in some leaves (-_-)
But the thing was that later on, when I went to brush my teeth, I noted that it totally matches my toothpaste (Darlie), haha...if you don't know of the brand, google and you will see that the yellow and green is practically the same shade as the toothpaste packaging :p
Posted by
barenailsnomore
at
21:52

Essence Wanna Be Your Sunshine with flowers
2013-02-17T21:52:00+08:00
barenailsnomore
acrylic paint|essence|flowers|freehand|nails|yellow|
Comments
Essie Go Overboard with roses
Posted by
barenailsnomore
at
13:51

Essie Go Overboard with roses
2013-02-17T13:51:00+08:00
barenailsnomore
blue|essie|flowers|freehand|nails|opi|orly|
Comments
Newspaper transfer nails
I came across nails using the newspaper transfer technique and thought it was such a fun idea so I gave it a try. But instead of using the words, decided to use cartoon strips instead.
Posted by
barenailsnomore
at
03:02

Newspaper transfer nails
2013-02-17T03:02:00+08:00
barenailsnomore
nails|newspaper transfer|orly|
Comments
Labels:
nails,
newspaper transfer,
orly
Flakies half moon (Nubar 2010 and Ludurana Flocado)
Yet another half moon as I have previously warned...guess I was going through a half moon phase back then :p This was when flakies were appearing everywhere in blogs and I was drawn in as well. The pic doesn't do them justice as the flakies were more visible in real life.
Posted by
barenailsnomore
at
00:55

Flakies half moon (Nubar 2010 and Ludurana Flocado)
2013-02-17T00:55:00+08:00
barenailsnomore
black|china glaze|essence|flakie|half moon|ludurana|nails|nubar|
Comments
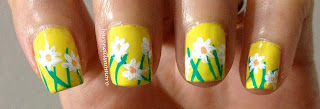
Pink with flowers
Colours used:
Pink - Couleur Inc Nocturne
White - Golden Rose (can't find the name)
Centre of flowers - Can't recall exactly but should be Revlon Mad about mango
Dots - Jessica Iridescent Eye
Nocturne appears in bottle as a cool pink with gold shimmers but looks a bit warmer on my nails. But it's a pretty polish and I applied 2 coats above. Somehow this ended up having a Japanese kind of feel? :p
Posted by
barenailsnomore
at
00:37

Pink with flowers
2013-02-17T00:37:00+08:00
barenailsnomore
couleur inc|flowers|freehand|golden rose|jessica|nails|pink|revlon|
Comments
Labels:
couleur inc,
flowers,
freehand,
golden rose,
jessica,
nails,
pink,
revlon
Saturday 16 February 2013
OPI Pirouette My Whistle
I'm pretty wary of sheer polishes, mainly because I find it hard to apply them without streakiness and because you need sooooo many coats to cover your nail line. But when I saw swatches of the OPI Ballet collection, I put aside my aversion as the sheers and glitter combi looked so pretty. I ended up getting OPI Pirouette My Whistle and a sheer jellyish pink from Essence since I figured I wouldn't use sheers that often and Essence is much cheaper than OPI ;)
Posted by
barenailsnomore
at
18:29

OPI Pirouette My Whistle
2013-02-16T18:29:00+08:00
barenailsnomore
essence|freehand|glitter|nails|opi|orly|pink|
Comments
Jessica Iridescent Eye and first try with acrylic paints
After reading so much about Chanel's Peridot, I was excited when I learnt of the Iridescent Eye dupe from Jessica as there was no way I was gonna pay >US$20 for a polish. Unfortunately, it was before OPI Just Spotted The Lizard was released, otherwise I would have opted for that instead as it was easier to purchase in my country than Jessica.
In any case, I got it from Ninja Polish (along with a couple of other polishes :p) and it is truly a one coater (great for stamping) with a strong greenish tinge which is even more obvious in the pic after the jump.
In any case, I got it from Ninja Polish (along with a couple of other polishes :p) and it is truly a one coater (great for stamping) with a strong greenish tinge which is even more obvious in the pic after the jump.
Posted by
barenailsnomore
at
17:46

Jessica Iridescent Eye and first try with acrylic paints
2013-02-16T17:46:00+08:00
barenailsnomore
acrylic paint|freehand|gold|green|jessica|nails|
Comments
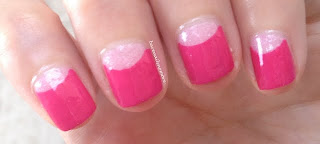
Hot pink half moon using OPI Holland collection
This is actually my first half moon mani after seeing it on many blogs (the leopard print one in the first post was like half a year later). The reinforcement rings method works well for me but the only thing to note is to make sure your base coat is dry enough (sometimes even when it's dry to the touch, it is still not dry enough!), otherwise the reinforcement rings will rip the polish off :( The second layer also needs to be pretty opaque so that you can just apply and remove the rings quickly to achieve cleaner lines.
Posted by
barenailsnomore
at
01:41

Hot pink half moon using OPI Holland collection
2013-02-16T01:41:00+08:00
barenailsnomore
half moon|nails|opi|pink|
Comments
Friday 15 February 2013
Purple pink cloud mani
Just to clarify, my first post was one of my more decent looking ones to have a good start :p But from here on, I guess I will post in chronological order and they are dating back from early last year. So just a heads up that you will probably be seeing polishes from older collections for some time until I clear the pics I have so far.
The following was my first attempt at a cloud mani when Orly Cool Romance collection was launched. This design was based on a tutorial from Nailside.
Posted by
barenailsnomore
at
20:44

Purple pink cloud mani
2013-02-15T20:44:00+08:00
barenailsnomore
cloud|nails|opi|orly|pink|purple|
Comments
Half moon and leopard print nails
First post on my first ever blog! My interest in nail polish started late but gathered momentum rather swiftly and since now my nails are almost always painted (hence bare nails no more ;) ) and I often take pics of them to keep a record, thought I could share them on a blog for fun.
However, I'm no manicurist nor professional blogger, hence paint job/cuticles might be messy and pics are normally taken whenever/wherever convenient with iphone so please bear with them. Hopefully I will improve with practice and be able to share better pics!
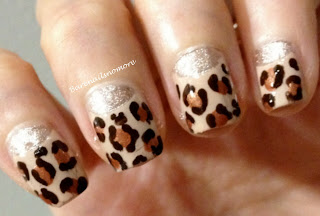
Guess I will start with one of my favourite freehand nail art so far - half moon leopard print
Subscribe to:
Posts (Atom)

